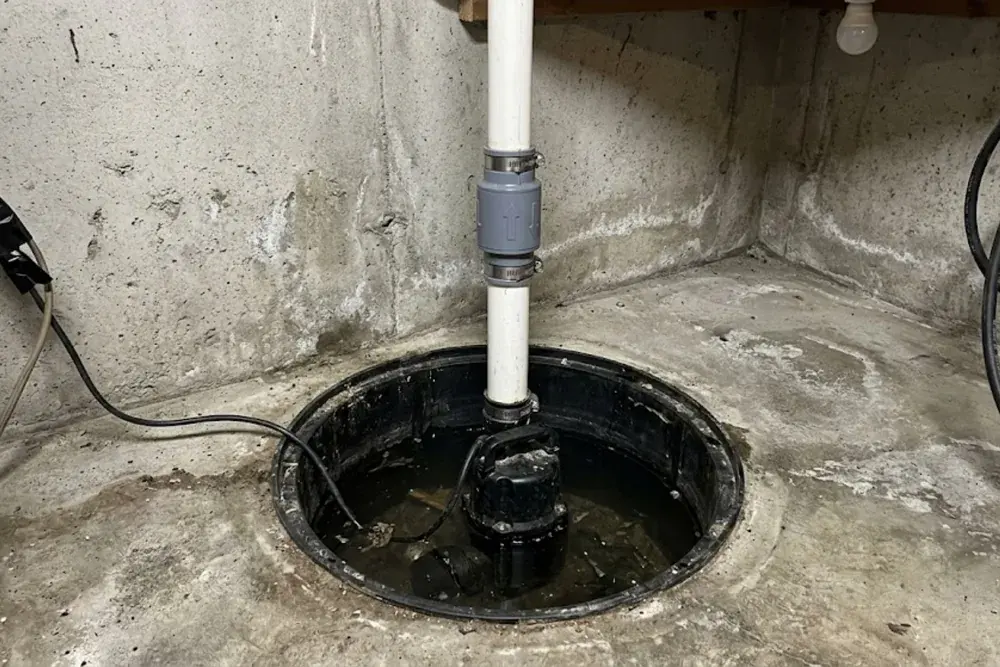
Plumbing a sump pump means connecting the pump in its pit to a discharge pipe that carries water out of the basement and away from the house, with a check valve to stop water flowing back. Done right, the pump works quietly for years. Done wrong, it fails during the first big storm.
This guide covers the parts, the order of assembly and the mistakes to avoid, and where a plumber is the better choice.
The parts of the system
- The sump pit, set below the basement floor, which collects groundwater.
- The pump, either submersible in the pit or a pedestal above it.
- A float switch that starts the pump when water rises.
- A discharge pipe that leads outside.
- A check valve that keeps water from falling back into the pit.
Plumbing it in, in order
- 1
Set the pump
Place the pump level on the pit floor, on a solid base so it does not sink into silt.
- 2
Attach the discharge
Connect a rigid pipe to the pump outlet using a fitting sized to the pump.
- 3
Add the check valve
Install it in the vertical run, arrow pointing up and away from the pump.
- 4
Run it outside
Route the pipe through the rim joist or wall, then to a discharge point away from the house.
Drill a small relief hole in the discharge pipe below the check valve. It prevents the pump from locking with air. Make sure the float can move freely and does not rub the pit wall.
Test the pump by pouring water into the pit until the float lifts. The pump should start, the water level should drop and no water should come back after it stops.
Mistakes that cause failures
| Mistake | What happens | Fix |
|---|---|---|
| No check valve | Water returns after each cycle, the pump short cycles | Install the valve in the vertical pipe |
| Discharge too close to the house | Water soaks back into the foundation | Extend the discharge away |
| Float restricted by the pit wall | Pump may not start | Center and secure the pump |
| No backup power | Pump stops during outages | Add a battery backup |
Our sump pump page explains repair, replacement and backup options. If water enters from walls or the floor rather than a pit, see basement waterproofing.
Choosing the right pump
| Type | How it works | Fits |
|---|---|---|
| Submersible | Sits in the pit, quiet and cooled by the water | Most finished or living space basements |
| Pedestal | Motor sits above the pit on a column | Tight pits and easier service access |
| Battery backup | A second pump on its own battery | Homes where outages and storms coincide |
| Water powered backup | Uses municipal pressure to pump out water | Only where local rules allow it |
Match the pump to the water it must move, not to the price. Ask how many gallons per minute it moves at the height your discharge must lift.
Maintenance that keeps it working
- Test the pump twice a year by filling the pit with a bucket of water.
- Clean debris from the pit and check that the float moves freely.
- Make sure the discharge outlet outside is clear of leaves, ice and mud.
- Check the battery backup on its schedule and replace it when it ages.
- Listen for unusual noise, which often means a worn bearing or a clogged impeller.
A sump pump has a limited life, and heavy use shortens it. If yours is more than a decade old or runs constantly, plan for a replacement before the next storm rather than during it.
When to bring in a plumber
Call a plumber if the pit is cracked or undersized, if the discharge has to be rerouted, or if you are unsure where water may legally go. Also call if the pump runs constantly in dry weather, which can point to a high water table, a failed check valve or a leak feeding the pit.
A professional can also size the pump, set the float correctly and test the system under load. Our team can look at the whole basement and tell you whether the pump is the right answer or only part of it.
Discharge pipe details that matter
Use rigid pipe above the check valve and keep the discharge line as straight as you can. Every elbow adds resistance, and long horizontal runs hold water that can freeze in winter. Slope the outside run away from the house so the pipe drains between cycles.
Add a screen or a grate at the outlet to keep animals and leaves out. In cold weather, check that ice has not blocked the end, since a frozen discharge makes the pump work against a plug.
Test it before the storm
Do a full test in the spring and again in the fall. Fill the pit until the pump starts, watch the outside discharge and confirm that the water leaves cleanly. Look at the battery backup and replace the battery on schedule.
Photograph the pit and the pipe layout. If something fails later, the photos help a plumber diagnose quickly.
Want a plumber to install it?
Call and we will schedule a visit.
Sump pumps in Marlboro basements
Where the discharge goes matters, and local rules may apply. Permit rules vary, so ask the Marlboro Township Construction Division at (732) 536-0200, extension 1800, before changing how water leaves your property.
Marlboro's suburban growth brought many homes with basements, and heavy rain and storms test them. The township's hydrant flushing and water notices are posted on marlboro-nj.gov, but those are separate from groundwater, so a sump pump is your own defense when the water table rises.
Questions homeowners ask
Away from the foundation and not onto a neighbor's property or a sewer. Confirm local rules with the township.
Yes. Without it, water in the discharge pipe falls back into the pit and the pump cycles unnecessarily.
Generally no. Groundwater belongs in a storm discharge or on the surface, and connecting it to the sewer is often prohibited. Ask the township.
A seasonal test is a good habit. Pour water into the pit and make sure the pump starts and clears it.
It depends on the amount of water the pit receives. We size the pump after looking at your basement and groundwater.